In this step-by-step documentation, we’ll cover How to Create, Track & Report SLAs in Jira.
How to create SLA in Jira
Jira – is a great tool that allows you to deal with business and propose a high level of customer service. Tracking SLA in Jira – the key to mutual beneficial cooperation with partners and clients. SLA Time and Report gives you the ability to track SLA for any level of support (L1, L2, L3, and L4).
To create SLAs for any Jira project, you need to install SLA Time and Report add-on on your Jira.

To begin, click on the configuration menu and add new SLA config.

During this step, you should select what type of SLA goals you want to use: time limit or negotiated date (you can read more below)

For new SLA config (with time limit goals) you will see the SLA configuration menu with such options for selection: name, project, work schedule, start/pause/stop conditions, and SLA goals setting with escalations.

SLA start/pause/stop Conditions
Using SLA Time and Report add-on, you can specify conditions when the SLA timer should turn on/off. Wide list of conditions including any issue fields (status, priority, label, etc.) and additional triggers (comment from, assignee changed, issues unassigned, etc) are available.
Inside any condition, you can select which one should be a trigger for start or stop (for example statuses To Do, Waiting for support, Reopened etc.)

Additionally, for list of start/stop conditions you can set such conditions logic as “AND” – “OR”.
SLA Reset
Except conditions for Start and Stop, you can set events for SLA Reset (SLA timer will stop tracking when issue or ticket will have a given field). There are such fields to reset SLA: Assignee, Comment from, Issue Type, Label, Priority, Reporter, Status.

SLA Multi-cycle Option
You can select Multicycle option for SLA Calculation. In this case, SLA timer will calculate time as the sum of all transitions between Start and Stop conditions. SLA Timer will turn on every time when start conditions will happen.

SLA Goals
SLA Time and Report users can select one of SLA goals:
- Time limit
- Negotiated date

Time limit based goal – requests the amount of time permitted to resolve issues (for example – 8h 35m.) Additionally, using this option, you can select colorful background for SLA timer.
Negotiated goals option allows setting SLA goals based on any issue date or time field (Due Date, Updated date, or any other custom issue date field)
! When you select this type of goal, Pause condition, Multi-cycle options and SLA Reset are disabled.
Custom fields
Each SLA goal can be added to issue’s custom fields. It will look like table on the issue view tab with a Target date and Status of the SLA goals. You can activate any SLA goal as custom field in the SLA Configuration menu.


Automate action
SLA Time and Report gives the unique ability for its users to configure automatic actions for overdue tasks immediately in the application menu (without the need for complex Jira’s automation settings)
You can set a separate automate trigger for any SLA goal. Such options are available:
- Notify user in comment
- Change the assignee to
- Change the priority to
- Change the status to

When SLA timer is in progress or met the goal it will be highlighted with green color, and automatically changed to red when the goal is exceed.
How to track SLA in Jira
You can track SLA timer on each issue view panel. You’ll get this data by clicking on the “Open SLA Time and Report” button.
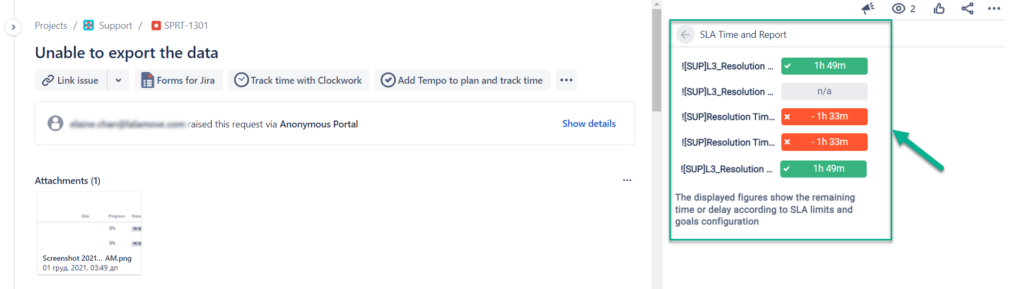
You can view SLA time data for each ticket with different time limits set at the SLA Config.
Also, if you have added a SLA goal to custom fields, you can track Target date and Status of the SLA goals on the issue tab.
If you use mobile applications for Jira, all necessary SLA data is also displayed on the Issue View Panel.
How to create reports in Jira
SLA Time and Report allows viewing detailed SLA reports in both table and helicopter view in chart reports
SLA Table report
This type of report shows a list of issues with detailed information about SLA goals.

The SLA report contains columns with information about issues (Type, Key, Summary – are constant; Assignee, Status, Time to SLA, etc. – can be changed at “Columns” menu) and column with SLA Timer data of every issue.
On the timeline, you can also monitor how much time is left until the time limit will be exceeded. Tickets with exceeded time will have a red color. Before the issue meets the time limits, its time counter will be highlighted according to setting in SLA config.
SLA Chart reports
You can get a general view about SLA statuses to the issue you need using graphs at SLA Time and Reports. There are 2 chart types:
- Pie Chart (SLA Met/In Progress/Exceeded)
- Line Graphs (SLA Met & Exceeded)
- SLA Met vs Exceeded per Assignee


Copy JSON URL for any SLA chart and use it as a source for external clip builders (e.g., Klipfolio, Gekoboard) to share it within your organization.